
Note: This is part 3 of an ongoing series. For earlier posts in this series, see the ReadyNAS 312 tag.
The findings so far …
Before diving deeper into this, let’s sum up the important findings from part 2:
- The unit most likely boots from the embedded flash-volume
/dev/sdcwhich is visible indmesg, but not from with in ReadyNAS OS itself once booted. - The main ReadyNAS OS firmware is actually located on the drives used for general purpose NAS storage.
- To be able to upgrade/reinstall the unit, we need to have access to all volumes, including the hidden flash-volume.
- This leads to a reversal of strategy: Try to work from the outside of the unit into the OS, not from the inside the OS out to the unit.
- In the kernel command line inside
dmesg, we have found evidence of a serial-port!
This last finding excites us very, very much!
Serial ports – The 101
For those into general embedded hacking, they already know why a serial port matters.
For those not that deeply into it, a serial port (if used by the firmware and OS) let’s us tap into a machine or device which lacks video-output, and monitor or control it from an outside unit, using a text-mode only interface.
More to the point: they often let us intercept the boot-process and take control from the second the unit is powered on.
Which is exactly what we’d like to do in this case! What luck!
Looking for the port
On embedded devices like routers, you usually have to dismantle the device, and look around, use your intuition and guess where the serial port may be hidden. It may not even have connectors soldered on.
To the uninitiated, that may sound pretty hardcore.
A simpler way to find such a port is … having the answer ready, provided for you by someone else.
Looking around the internet, it seems like most of the ReadyNAS devices out there have a serial port of sorts. For some models, the fact that it’s there is even documented, or at least was.
But where is it?
Looking around, I found a few posts saying you needed to peel off a sticker to reveal it. Coming from embedded hacking, that sounds really familiar!
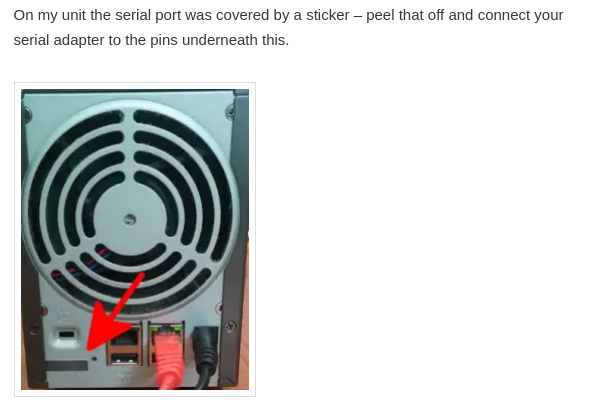
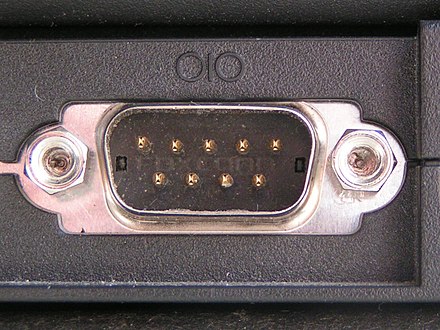
So let’s take a look at the ReadyNAS 312 once again… And what do we see?
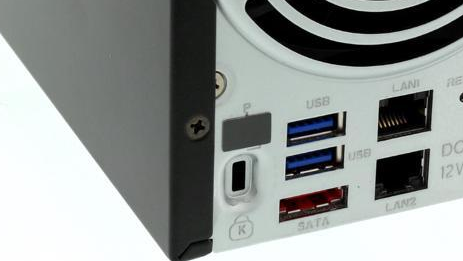
That clearly looks peelable! And underneath?
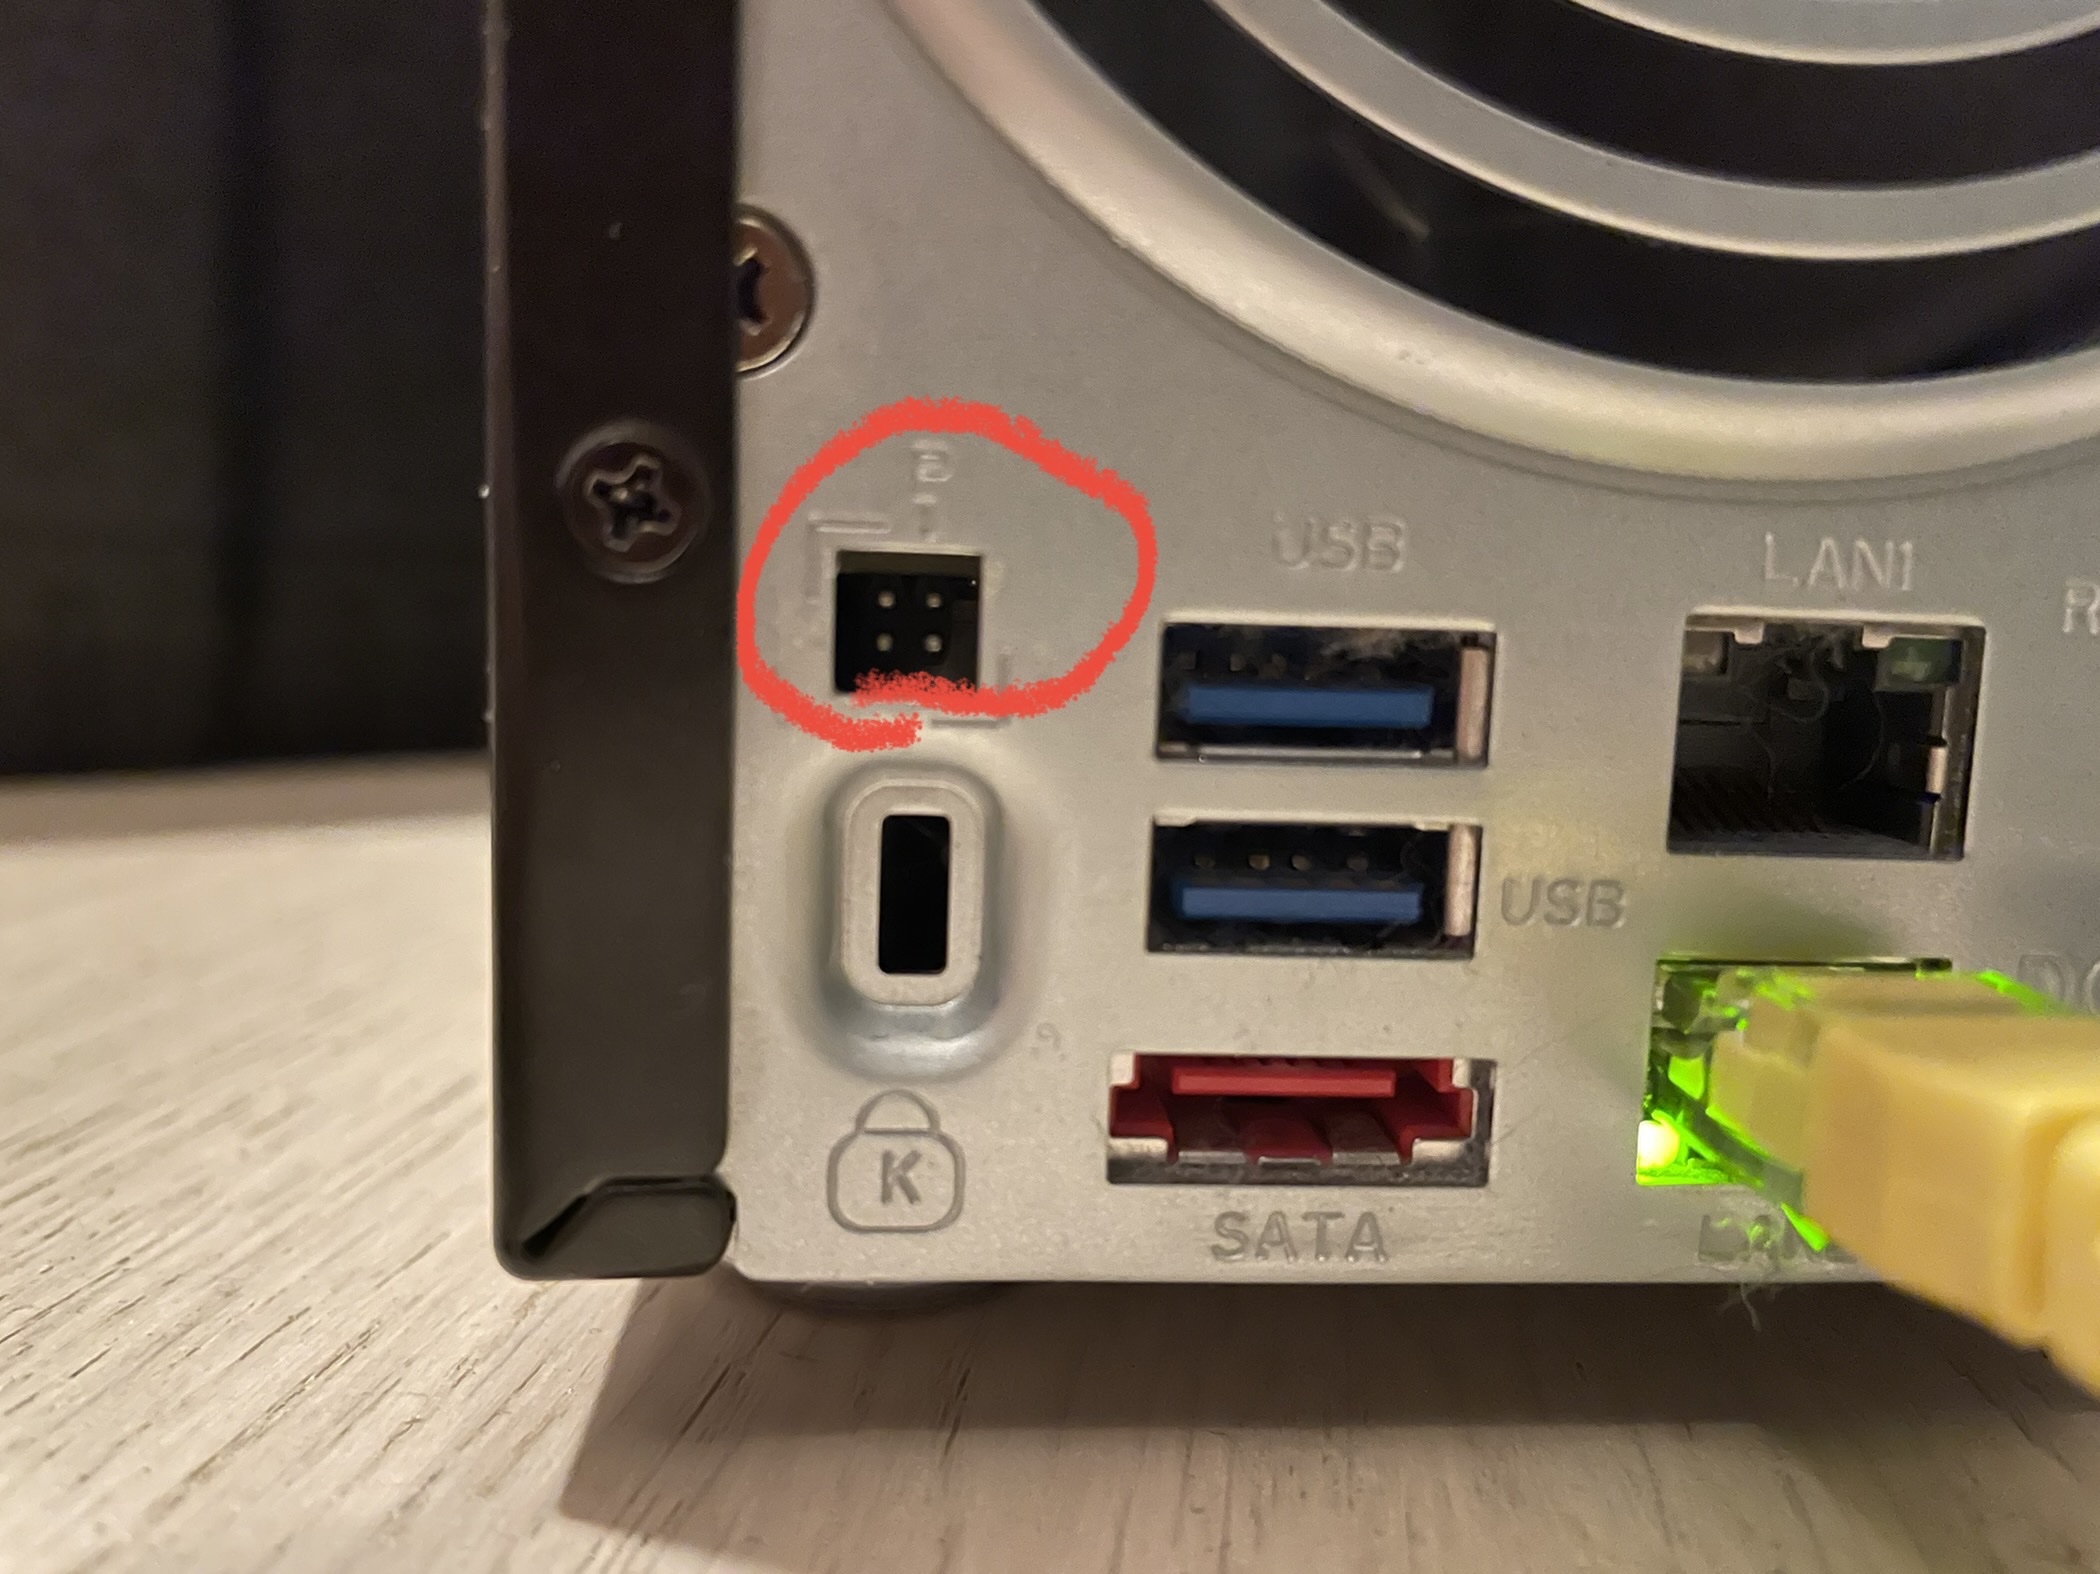
That’s got to be it!
Houston we’ve got contact!
Uncovering the serial port pin-out and configuration
First things first: We need to determine the pin-out.
This is usually easier when you can see the PCB the port is connected to, but to save ourselves from dismantling the device, let’s again try our luck and consult the internet.
And from the friendly website natisbad, we find this:
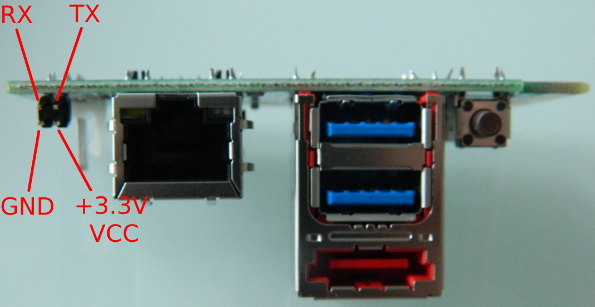
While the rest of the ports differ slightly, that serial port at least looks the same. It’s very plausible that this is our setup. Amazing stuff!
Wiring it up
Now to actually hook up to this serial-port, you need a serial-port on another computer to hook up with. As a default, those are getting pretty rare these days.
I mean, does your computer ship with one of these ports?
Computers sold last century had those to connect mice and other eccentric peripherals, like modems. Not so much these days.
So what do you do?
- If you have a Raspberry Pi, among all the magic pins in its huge GPIO connectors, it actually has a serial-port too. The pinout on the RPi may differ slightly between revisions, so make sure to check for your specific model. Also note, you probably have to enable it in the OS too.
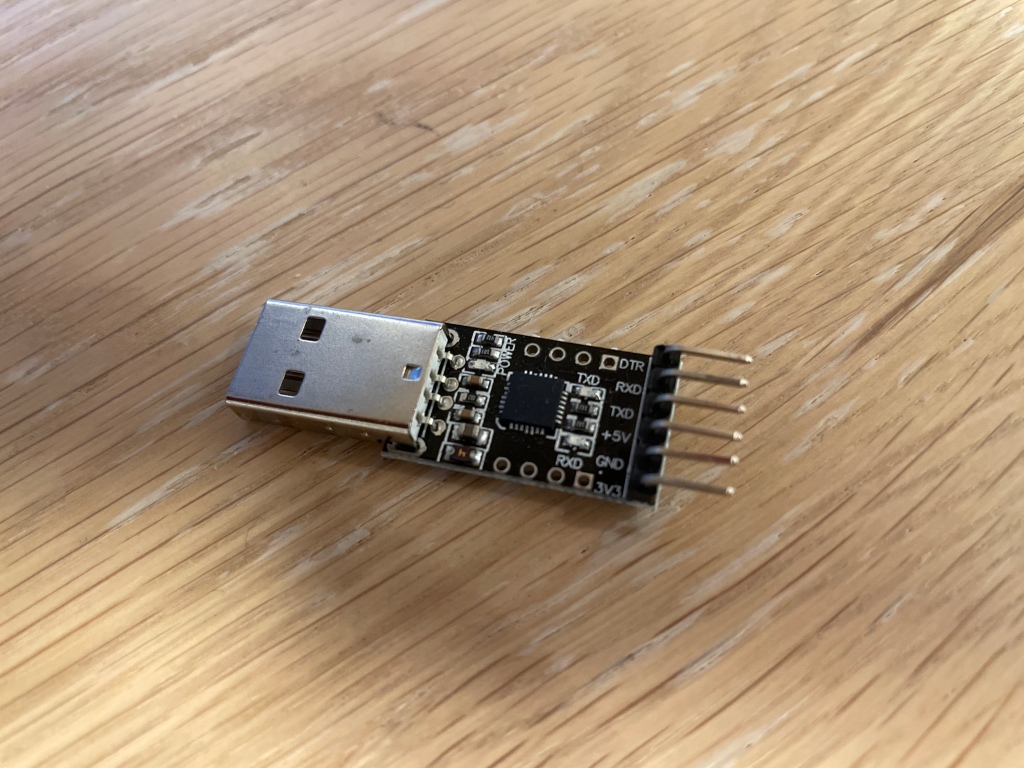
- Buy a cheap USB serial-port dongle from Ali Express, Deal Extreme, Ebay or wherever. Your luck may vary, but on Linux I’ve had luck with
cp210x-based units which has support directly in the kernel without any additional drivers. - Remember to buy the required cables too!
Obvious gotchas:
- The picture with the pin-out looks kinda upside down. You may inadvertently and subconsciously translate that image 180 degrees around, and apply the pin-out incorrectly. (I did this once and fried one of my USB serial dongles. Thanks god for having the Raspberry Pi as backup!)
- TX on one port should go to RX on the other port, and vice versa. I’ve done this mistake sooo many times.
In the end you should have something looking like this:

Configuring the port
Now we know the location of the port and we have a very probable pin-out at our hands.
Now we need to tie it all together.
My experience when working with devices like this is that it’s almost without exception working at a rate of 115200 bps. And that’s what the ReadyNAS kernel command-line says too, so that’s a safe bet:
root@ReadyNAS:~# dmesg | grep ttyS
[ 0.000000] Kernel command line: console=tty0 console=ttyS0,115200 hpet=disable initrd=initrd.gz reason=normal BOOT_IMAGE=kernel
In Linux, on a Raspberry Pi, you will typically find the serial-device at /dev/ttyS0. If you use a USB-dongle, /dev/ttyUSB0 is more likely. If in doubt, just insert the dongle, run dmesg, and see what device got added by the kernel at the very end of the log.
With that in place, let’s get our hands dirty.
Let’s go digging!

Enter Minicom
First things first. What is Minicom? From wikipedia:
Minicom is a text-based modem control and terminal emulator program for Unix-like operating systems
Use the following commands to get started (and adapt serial-port device to your needs).
sudo apt install minicom
sudo minicom -D /dev/ttyS0
At first I didn’t really get a response, and when that happens it’s because you still haven’t really configured the serial-port yet. So much work! This is clearly not plug and play!
In Minicom, press CTRL-A then Z to bring up the help-menu:

From here, click O (the letter O) to bring about the configuration menu, and then choose “Serial port setup”:

Make sure it looks like this:
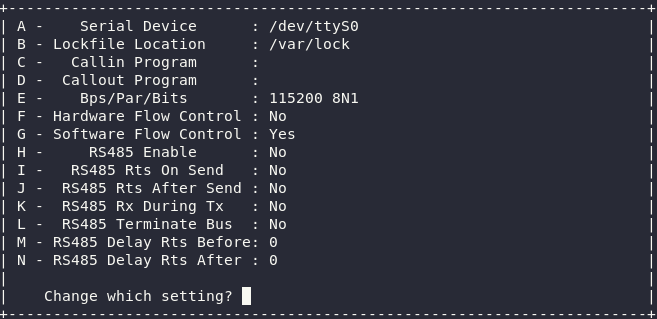
Notice you want Software Flow Control ON, and Hardware Flow Control OFF. You can toggle this by first pressing F, then pressing G.
Press ESC twice to exit both menus, leaving you back in a blank Minicom console.
If you’ve done everything correctly (and the unit is powered on), pressing enter in Minicom should now give you this friendly prompt:
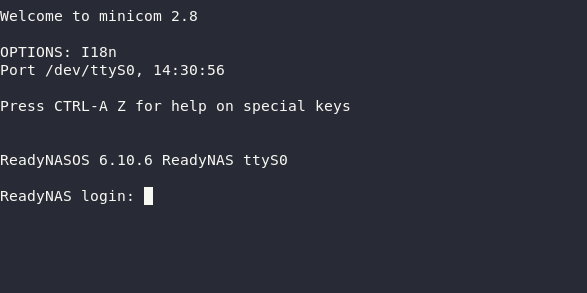
When working with embedded devices, this is where I usually preemptively declare victory and assume that from here on out, I got all I need.
This is clearly a major breakthrough!
Now if you don’t get a prompt like that, but only stuff looking like garbage or nothing at all, you may try the following:
- Reboot the ReadyNAS. Sometimes when fiddling with the port (and failing!) from inside a booted system, the rate may sometime get set to 9600. Don’t ask me how. At reboot it was reset back.
- Double-check the wiring again. Ensure TX on one end is wired to RX on the other end.
Assuming you got all that working… Now what can we use a serial console for? And what can we use it for on this device?
Find out in the next post! This is where things are starting to get fun!
Roll credits, and a short disclaimer
Wiring up a serial-port incorrectly can severely damage your units.
One USB serial-port dongle was terminally damaged as a result of this operation. May it rest in piece.

One response to “The ReadyNAS 312 – the (not so) secret serial-port”
[…] (Continued in part 3) […]
LikeLike