-
A “short”: The Inteno EG400 router (part 3)

Note: This is part 3 of an ongoing series. For earlier posts in this series, see the EG400 tag.
The story so far…
Before continuing, let’s sum up the key parts of the previous article:
- To access my fibre internet-subscription, I’m forced to use an ISP-provided router, the Inteno EG 400, which I’m not given full access to.
- To be able to replace the router with another one, I need to extract the WAN uplink configuration from the EG400.
- I’ve tried playing nice, I’ve tried known exploits against the firmware, and I’ve even written custom tools to try to brute-force my way to and admin or root login.
- And no success so far.
So what do you do when trying to do things the easy way doesn’t work out?
Taking the hard way
With the firmware/software on the router not giving in to my attempts to extract its secret up-link configuration… I decided it was time to try to investigate the hardware instead.
My hope was that since Iopsys is based on OpenWRT, and OpenWRT’s serial-console boots straight into a root-shell… The same might apply to this router. I might get lucky, right?

A typical OpenWRT serial-console booted into a root-shell On my own… again
So all I would need to do was to hook up to the serial-interface which surely must be documented somewhere on the internet, and I should be good to go. Sounds simple!
Unfortunately, as already mentioned, the EG400 is not an enthusiast’s router. While there are other Inteno-routers out there, dismantled and documented somewhat… No such community documentation was available for the EG400.
If I wanted to obtain serial-access to this device, I would have to do all the research myself. Again.
Dismantling the device itself was fairly conventional and definitely not hard. Simply peel off the rubber feet on the bottom of the device to expose the usual screws, unscrew and carefully remove the top lid.
The router is assembled with the bottom side of the PCB facing up, meaning most of the interesting stuff is inaccessible without pulling the board entirely out of the router:

Sometimes router-vendors stick to the same basic PCB-design between different models and revisions, so research done on one board can be applied on different models too.
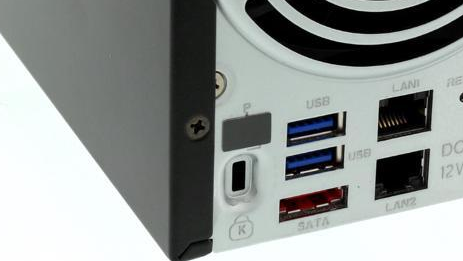
The EG400 precedes an earlier model, the DG301B for which there at least exists some community knowledge. Most importantly it includes where to find the serial-port on the PCB.
To my disappointment, the boards was nowhere near alike:

The DG301 circuit-board 
My EG400 circuit-board In particular the serial-connector interface which is documented for the DG301B is nowhere to be found on the EG400 circuit-board.
That said, there are at least three distinct PCB-connectors:

Both
J3andJ11seemed promising wrt to being possible serial-ports. The third PCB-connector has enough ports to possibly be a super-powerful JTAG-connector, but I’m no JTAG expert, nor do I want to guess my way on a 12-pin connector. At least not if I don’t have to.That leaves me
J3andJ11. I admit I only realized this later, but for practical purposesJ11is actually exposed through the bottom of the router when fully assembled. It’s subtle, but it’s there!
While that makes it very likely that it should be accessible for service-technicians, and thus provide serial-connectivity, the actual circuitry around the connector is non-obvious, at least to me.
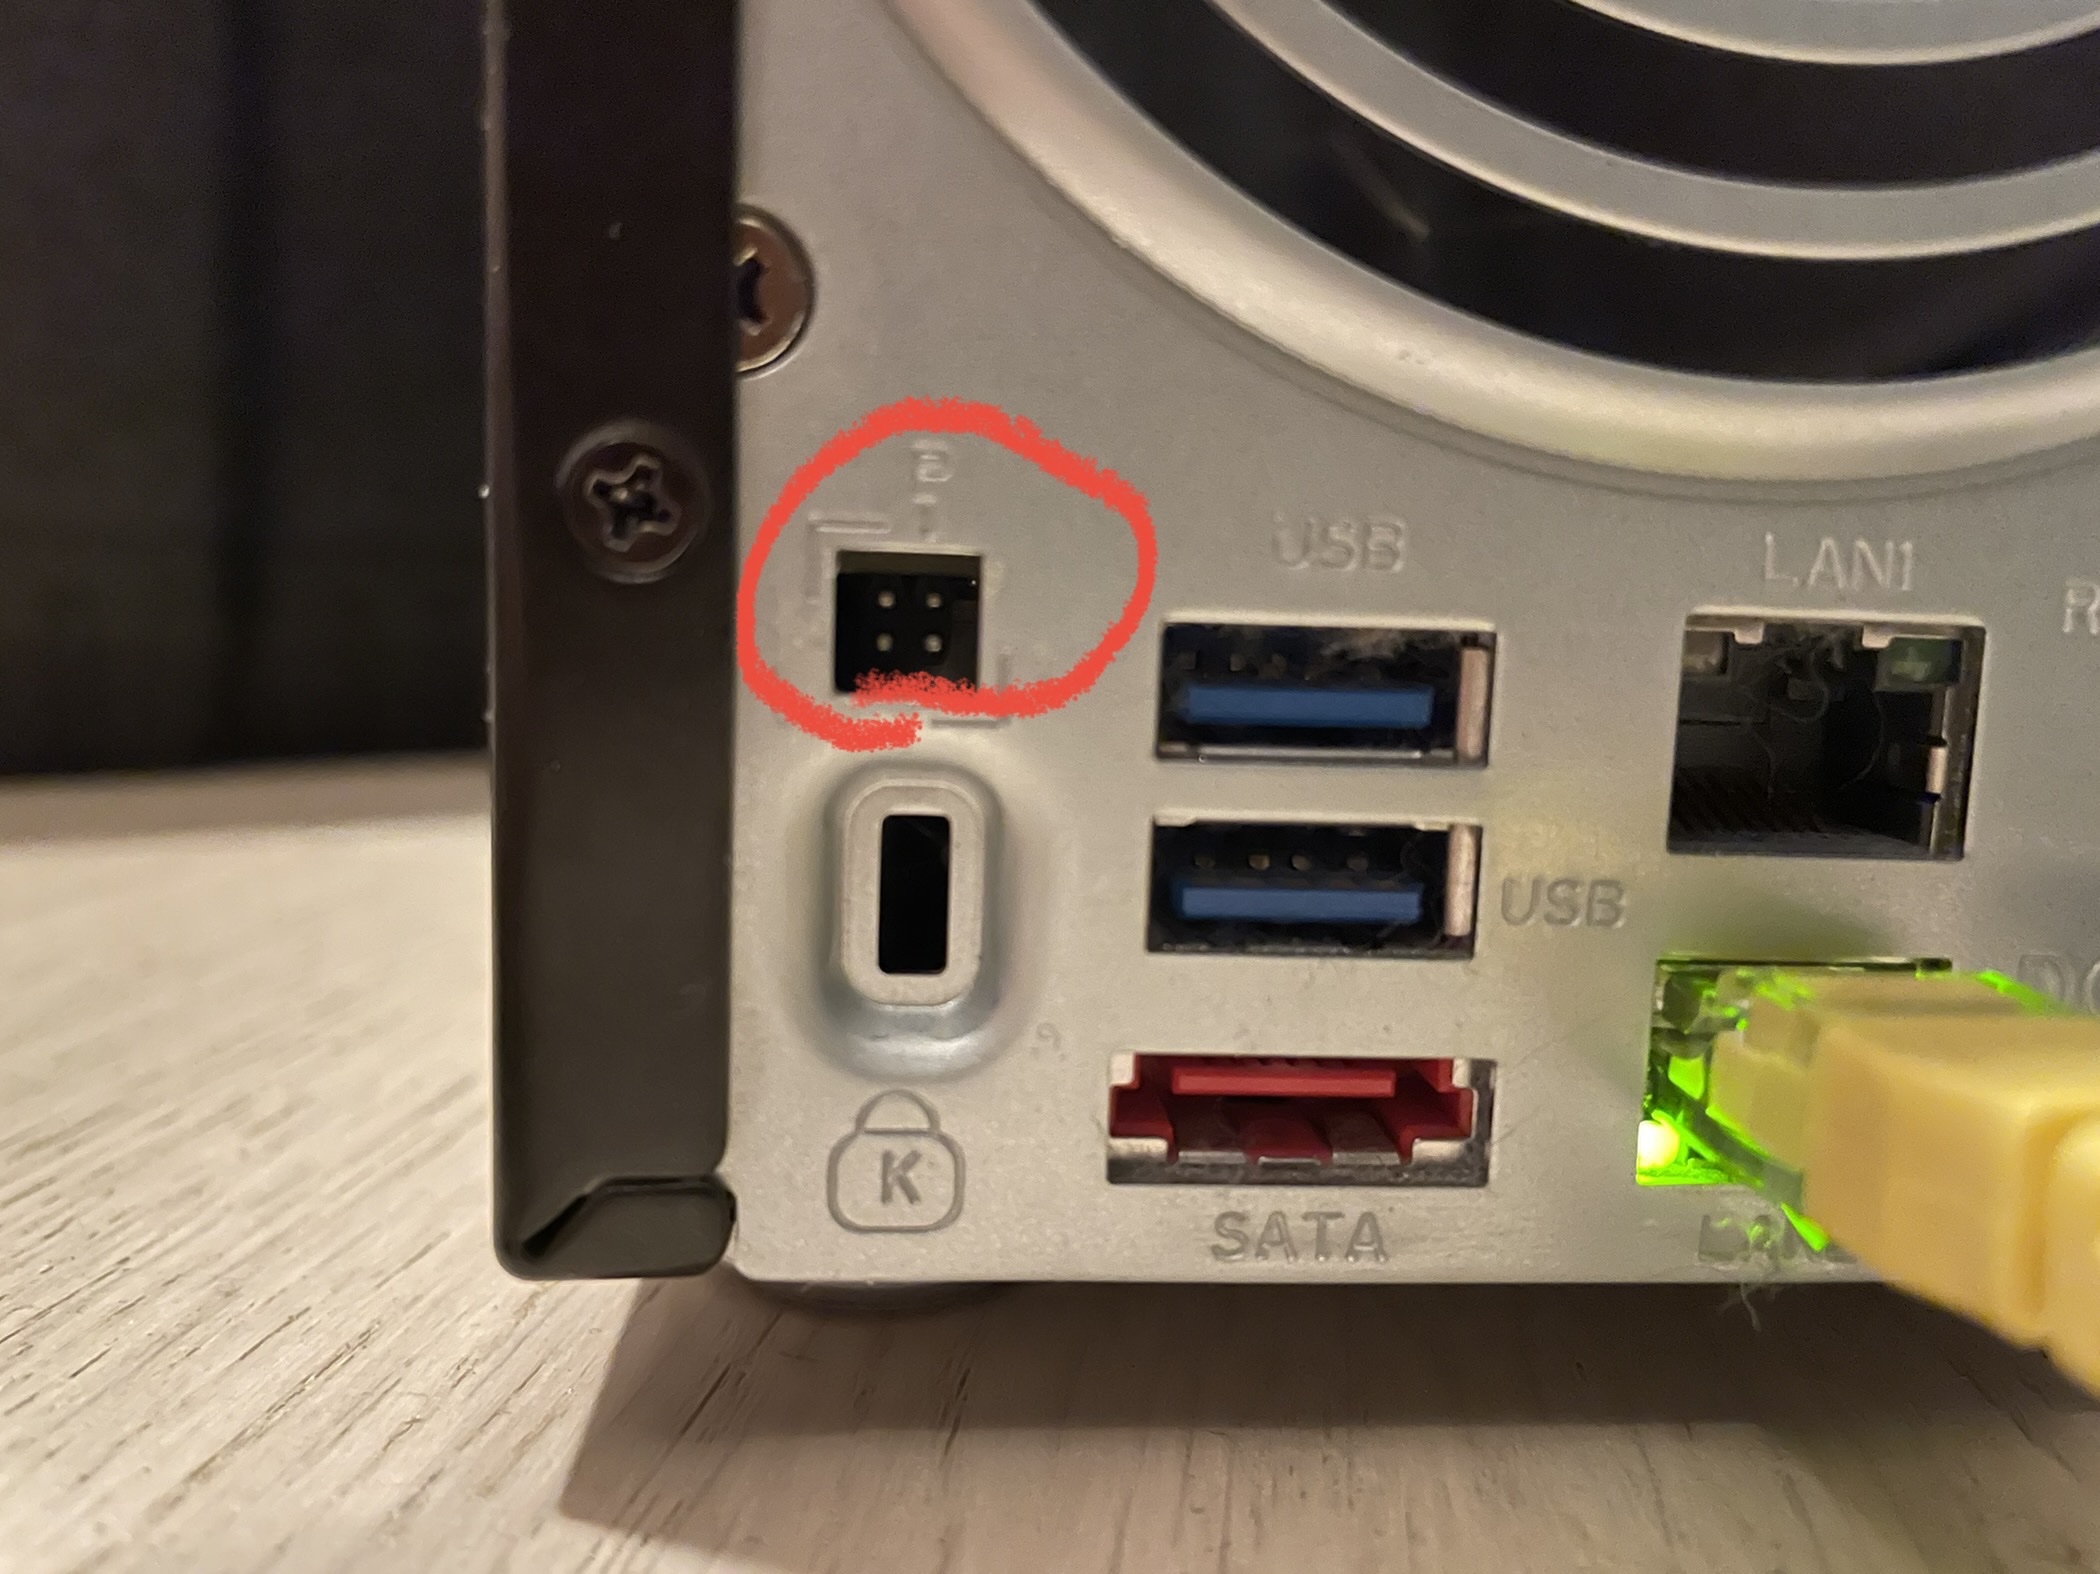
That leaves us
J3which is much simpler. 4 pins, 1 big ground surface around it and … Is that 2 wires being lead out from the connector?
1 ground + 2 signal paths = 1 serial Let’s just say that getting this connector right didn’t take me long!

So I try the standard embedded serial-configuration (8N1, 115200 bps)… And it’s alive!
HELO
CPU0
PMCM
PMCS
PMCD
CODE
L1CD
MMUI
ZBBS
MAIN
4.1605-1.0.38-118.3-INT1.5
DRAM
NVRAM memcfg 0x10427
MCB chksum 0xf52f553a
DDR3-1600 CL11 %dMB High Temperature SRT
Changed Byte Lane LDE
Changed Byte Lane LDE
PASS
NAES
LZND
LZOK


Base: 4.16_05
CFE version 1.0.38-118.3-INT1.5 for BCM963138 (32bit,SP,LE)
Build Date: Tue Jan 14 16:22:02 CET 2020 (inteno@bs1)
Success! Finally!

For those interested, the exact pin-out is like this:

And with those exciting news out of the way, we take a brief break before returning in the upcoming part 4!
-
A “short”: The Inteno EG400 router (part 2)
Note: This is part 2 of an ongoing series. For earlier posts in this series, see the EG400 tag.
The story so far…
Before continuing, let’s sum up the key parts of the previous article:
- To access my fibre internet-subscription, I’m forced to use an ISP-provided router, the Inteno EG 400.
- The ISP-provided router does not really suit my power-user needs, and it’s causing me network stability issues.
- This router is also locked down and only my ISP has full access to its settings. I cannot extract the settings I need and apply them on another router.
- At this point, I’m very eager to eliminate this device from my network, mostly out of spite. And I’ve started treading down the path of the dark-side.
That… doesn’t quite sound like a story of re-use, at least not yet?
Forging my own path
The Inteno EG400 runs a type of firmware called IopsysWRT, based partially on OpenWRT.
Previously I tried taking advantage of documented security vulnerabilities in the IopsysWRT firmware on the device, in order to gain root-access, unsuccessfully.
All known vulnerabilities were patched on my firmware revision, and I was no closer to root, or at least so it seemed.
While pre-made tools and discoveries were of no use for me, trying them out had lead me to discover a protocol used by the firmware called ubus:
To provide Inter-process communication between various daemons and applications in OpenWrt a project called
The OpenWRT wikiubushas been developed. It consists of several parts including daemon, library and some extra helpers.And as demonstrated by all of the exploits, ubus was intentionally exposed on the built in web-server, to power the Juci-based management UI.
It was used for everything. And “everything” does include account login!
So in theory I could write up a script/utility to attempt to brute-force the login, simply by following the ubus protocol, and having a little bit of patience!
And so I did!

That was great and all except for a few things:
- I first used the existing Python exploit-scripts, removing everything except the login code, trying simple dictionaries.
- That was too slow, because I was constantly setting up web-sockets for ubus, only to tear them down instantly.
- Fixing that did speed things up, but eventually lead to “memory-issues” causing the script to fail after a few days.
- Rewriting it in Rust solved that. It ran at a consistent 4kb memory, 4% CPU and around 600 passwords a minute. But it was still taking weeks with no root-access in sight.
- Math and the laws of exponential growth caused by longer passwords started implying I’d have a new ISP before my brutish and simple attempts paid off.
- And I lost my patience.
Sooo another dead end!

With all that stuff leading nowhere, I won’t bore you with code details or samples.
But I didn’t accept defeat just yet. There had to be a better way!
So … when you can’t bend the software to your will, the new logical thing to try is to bend the hardware instead. Not literally of course.
More on that in an upcoming next part!
-
A “short”: The Inteno EG400 router (part 1)
Chances are that you haven’t heard about the router-manufacturer Inteno. They’re small, they’re Swedish, they’re not exactly end-user oriented. They’re not gamer-grade nor are they cool.
Their primary business seems to be making routers for ISPs, for the ISPs to hand down to their customers, pre-configured, locked down and ready for use. They’re the suits of the router-industry, purchased by other people wearing suits.
And that’s how I got my Inteno EG400 router. My ISP handed me one of these with my Fiber-to-the-Home internet-subscription, and gave me no choice in the matter. If I were to use their service, this was the router I was going to use.

It was fast and I admit it looks pretty sleek, but as a router I did have a several problems with it:
- Just in general: It didn’t run OpenWRT. But given the following point, that’s pretty moot.
- I get to log in as a user, not as an admin. The router is the core of my network, yet I don’t get to make the rules. That’s not gonna fly.
- If I want all my needs covered, I need to switch it from its default “routed” mode to bridged mode, and attach a “real” router behind it, which I can actually configure.
- It was flaky and often rebooted back into “routed” mode, requiring manual intervention to restore the connection to bridged mode. Which of course I couldn’t fix remotely if it ever happened while I was out on the road.
In short: Bad times. I didn’t like it.

Simple things first
The simplest solution of them all would of course be to not use the router at all. Helloooo!
Basically just wire up my real router directly to the fiber-module, and call it a day. Simple.
Except that didn’t work. Instead of internets, I just reached some locked down, boring management subnet with no fun in sight.
It’s the configuration, stupid
So to connect me to the internet, behind the scenes and transparent to me, the router obviously did something more than just issuing a DHCP-request. But what?
As far as I could tell, nowhere in the EG400 web-UI did it say how it was setting me up to the WAN network:
- Did it authenticate the connection using PPPoE?
- Was there some other handshake or configuration which was needed?
- Did I need to issue my DHCP-requests using the right MAC?
Whatever the answer was, as a mere router user, I was not authorized to such details. For that I needed admin-access, which just to reiterate, my ISP had not provided for me.

Sad user is sad But instead of digging into the router, perhaps I could get the right settings somewhere else?
Sadly the ISP support-pages were of no use. They described how to plug in cables into their routers. No servers, no IPs, no protocols, no nothing. I mean c’mon!
Contacting their end-user support was also not very productive, and I honestly don’t think they understood what I was asking about at all. Their answer was mostly the same:
“We don’t support that. You have to use the provided router.”
My ISP being a very helpful ISPSometimes you do things for constructive, positive reasons. Other times you do things out of spite.
I’m proud to say what follows is things I did purely out of spite, but to be fair, it did also lead to positive, repurposable outcomes!
Motivation
Before getting too deep, let’s start with my motivation. It is as simple as it is absolute: My goal was to be 100% in control of my own network. I think that’s a fair requirement, and I absolutely don’t think that’s an unreasonable expectation.
In this case, the Inteno EG400 was clearly the antagonist preventing that from happening.
In order to achieve my goal, I had to somehow defeat this router.

Making a simple plan, but little progress
In this case, my end goal was uncovering the settings which would allow me to not have to use this router at all.
Working from there on and backwards, a logical step would be to find a way to obtain admin or root-access on the router, to extract the configuration.
While that seemed conceptually simple, there were issues:
- The Inteno EG400 runs a firmware called IopsysWRT which has some default passwords, before being customized by an ISP (root/root & admin/admin). Sadly those defaults didn’t work, so my passwords were probably ISP-specific.
- My ISP was at the time named “Get”. Try searching the internet for “Get internet admin password” (or variations of that) and try to get meaningful results. Go ahead and try. I’ll wait!
So that didn’t work, at all.
With no luck finding anything usable passwords on the open net, I had to go into shadier territory, to the dark side.

And by dark-side, I mean rooting.
To quote myself from the ReadyNAS 312 series:
When working with appliances of different sorts the term “rooting” is often used to denote taking over control from a locked down firmware. Technically speaking it means getting control of a root-account within a running system.
If I can’t get a admin-login to the web-interface… Perhaps I can get root-access on the device itself. That would clearly be even more powerful.
So just how does one do that?
- You’re either a security researcher/genius, and able to smell exploitable software-weaknesses a mile away.
- You take advantage of the fact that these days, software-vulnerabilities are often documented and disclosed as so called CVEs. And contrary to the usual rule, you hope your device is not patched.
I’m obviously not the former, so I’l go for the latter approach. But before we go there, I guess it’s time for a word of warning.
Important disclaimer: Attempting to hack or root a device, if done incorrectly, can leave the device inoperable, bricked or in other ways lead to persistent or permanent damage. Do so only at your own risk, and only if you understand what or how the rooting technique or exploit actually modifies your device to allow you root access.
While I didn’t find any CVEs for this router specifically, Iopsys as a platform has seemingly had a few, much thanks to the Estonian hacker/security-researcher Rasmus Moorats:
- Remote Code Execution vulnerability in Inteno’s Iopsys (Iopsys 2.0-3.14 & 4.0)
- Unsafe firewall includes allowing for remote code execution on Inteno’s IOPSYS devices (Iopsys 1.0-3.16)
- From writing to /tmp to a root shell on Inteno IOPSYS (Iopsys 3.15)
I was running on a firmware-revision succinctly labeled as “EG400-WU21U_GET3.16.7-190524_1335″. That’s clearly a 3.16 Iopsys-revision, so I decided to try them all. I might get lucky, right?
Another obvious disclaimer: Running exploit code like this should only be done against systems you yourself own. Running code like this against other people’s systems are in most jurisdictions legally defined as a crime and has severe penalties.
Now, with the CVEs ethically tested against my own router only, no crime committed, I was in for another round of disappointments:
None of them worked. No root for me ☹️
Practically speaking, I hadn’t made any progress at all since I started looking into this. That’s no fun. But perhaps there were other ways?

So far I had only been looking for existing solutions, made by someone else, ready to be used.
If I wanted to get anywhere, it was getting increasingly clear that I needed to transition to a new strategy.
I needed to start doing my own research and making my own tooling.
I would in effect have to become that security researcher/genius I was talking about earlier. Oh noes!
Read all about just how that turned out (and more!) in the upcoming part 2!
-
The ReadyNAS 312 – A finale of sorts
Note: This is part 5 and the final post in a multi-part series. For earlier posts, see the ReadyNAS 312 tag.
The findings so far …
Before arriving at our finale, let’s sum up our findings so far:
- We have a Netgear ReadyNAS 312 which is decent hardware, but in lack of software-upgrades will become obsolete e-waste.
- We have uncovered a concealed serial-port, and established that it gives us full machine control, including BIOS access.
- We’ve established that the device is USB-bootable, with a few notable restrictions, and successfully booted a modified (serial-enabled) Debian-netinstaller.
- We now know that to repurpose this unit, we will need to start overwriting the ReadyNAS firmware.
At this point there should be no more surprises. We should be ready to finally land the job. Or at least so we think!
Coming up with a final plan
ReadyNAS OS divides its data into 4 distinct partitions:
- internal flash (
/dev/sdc), used for boot (but not as/boot!). - the Debian root file-system (
/dev/md0softraid over/dev/sda1and/dev/sdb1), which is only 4GBs in size. - swap (
/dev/md1, softraid over/dev/sda2and/dev/sdb2). - The user’s actual NAS-data (
/dev/md127over/dev/sda3and/dev/sdb3), stored using Btrfs, mounted as/data.
While I would generally choose ZFS over Btrfs (for a variety of reasons), keeping the
/data-partition as Btrfs for now means I can immediately access my data after finishing the upgrade. That’s a huge benefit.If I were to change the file-system used here, I would first need to migrate the existing data off the NAS to temporary storage, reformat the /data-partition (or the whole NAS) as ZFS, and then migrate the data back in. And that sounds like a whole lot of work for only marginal gains. Also ZFS tends to use more RAM than Btrfs, and with only 2GB this unit is already fairly limited.
So for those two reasons I’ll keep
/dataas Btrfs, at least for now.As for booting… In theory I could boot from internal flash, and then continue booting from an external USB-volume. Such a minimal solution could be to just install rEFInd on the internal flash volume, and configure it to boot an external (USB-)volume, leaving most of the internal volumes and firmware untouched.
That however would make the NAS act less as a stand-alone unit, and more rely on external components, like easy to lose USB-sticks.
As such, I would like to keep the unit working as much as possible like it used to: Entirely on its own.
To make the upgrade as easy as possible, I intend to reuse all the ReadyNAS OS partitions, more or less as is:
- boot (
/boot) still on/dev/sdc, the “usual” way, but exposed in the OS. This is required for seamless boot with the BIOS in place. - rootfs (
/) still on/dev/md0, but using ext4 rather than Btrfs. - swap still on
/dev/md1. - user-data (
/data) still on/dev/md127, keeping it on Btrfs.
That leaves us one final question: What Linux distro should I aim for? Ubuntu Server or Debian? Ubuntu Server is slowly heading in a direction I’m not that happy with (Big focus on IoT, deb’s being replaced by snap’s, cloud-init services, etc), and in general Ubuntu tends to be a bit more “bloated” than Debian.
With only 4GB to play with, and Debian being better aligned with my goals, it seems there’s one easy answer here.
And with that settled, we got the plan nailed. The best of all: If everything fails, we still have all the ReadyNAS components we need backed up in a quick and easy to restore manner.
So lets’s go!

Installing Debian, the hard way
At this point, I would like to make an admission.
After all this mucking about, after all this research, after all this work getting what I need to be able to safely do a firmware replacement over serial… I’m not going to do any of that. Wait what?!
There’s a reason for that, obviously: It’s not because I chickened out. Rather it’s because in the end I found an even easier and safer way!
Geeks are gonna geek
It’s a known thing that geeks like looking for a technically impressive or fancy solution to a problem, even when it’s not needed. It’s basic self-validation: “Look at what I can do!”
While having those technical capabilities in itself is not bad, it often means that one tends to overlook simpler solutions, even when they exist, right in front of your very own eyes.
Turns out, in this case, I could have stopped earlier, way earlier, and … well used a more direct optical approach.
Since a picture is worth a thousand words… See if you spot anything in particular in this image:

Notice anything at all?

I mean, not to shove it in your face or anything, being filthy and dusty like that, but…

A dusty port with a label which says “HDMI”. I wonder what that’s for? So back when
lspcirevealed that there was indeed a graphics-card in the machine, and I hypothesized how that could probably be a connector somewhere on in the inside…Uh…
There’s an HDMI port there. In plain sight.
Gee I wonder what that can be used for? Right?

Essentially, this one single port changes the situation:
- from dealing with a serial-only device with limited interfacing capabilities and install-media availability, and a decent chance of bricking to…
- to dealing with a normal PC, basically unbrickable, although with a locked BIOS boot-order preference.
Ahem. You don’t exactly have to be a master hacker to install Debian on such a device.
Installing Debian, the easier way
So without further ado, I present to you the regular Debian Graphical installer USB-booted and running on this NAS, connected to a regular monitor, using a highly regular HDMI cable, all operated using a regular keyboard and mouse.
Prepare to be amazed!

And with that all done and over…. We have this:

It’s running a recent Debian-version, it got a non-obsolete kernel-version and it still has our
/data.Mission accomplished, but I supposed in a severely underwhelming way? In the end, the upgrade was very, very easy and if you have one of these NASes, I definitely advice you to go make the same or a similar upgrade.
Calling back to the mission in my Hello repurposable World opening-post, I guess this device can now be considered fully repurposed and saved from becoming e-waste.
One device successfully saved! Are there perhaps more to come?
-
The ReadyNAS 312 – A new hope
Note: This is part 4 of an ongoing series. For earlier posts in this series, see the ReadyNAS 312 tag.
The findings so far …
Before diving deeper into this, let’s sum up the important findings so far:
- We have a Netgear ReadyNAS 312 which is decent hardware, but in lack of software-upgrades will become obsolete e-waste.
- We have not only found a concealed serial-port, but also the pin-out and the port-configuration.
- We are very optimistic about what this will enable us to do.
We now have a new hope.

A change of pace
This post starts with what one could consider both a teaser and a disclaimer:
So far we’ve only been probing around, building up an understanding of how this unit works. We have not in any capacity fundamentally altered anything or made significant changes to either the hardware, software or configuration.
The discovery of the serial-port changes this. We’ve learnt a lot of things. And now we have the “god-mode” we need to employ that knowledge into meaningful changes.
From here on out, we will be carefully making changes, test what works and what doesn’t, and make a final plan for how our new “god-mode” powers can allow us to save this unit, to properly repurpose it.
If you are planning to do something similar to a ReadyNAS of your own, make sure you fully understand what we’re doing, and what the consequences of doing that is.
Making mistakes is human, all failures have a degree of uniqueness and you may need to be able to revert previous changes without explicit instructions detailing how provided here or elsewhere.
And with such web-legalese out of the way… Let’s get going!
The serial-port 101 (part 2)
When working with appliances of different sorts the term “rooting” is often used to denote taking over control from a locked down firmware. Technically speaking it means getting control of a root-account within a running system.
With the ReadyNAS with didn’t have to go rooting at all. Getting root-access was even documented!
Our problem is that root-access only gets us control and access within the currently running operating-system, but we wanted to replace that with something else altogether.
While root-access can be used to obtain further access, it can only do so from within the confines of the currently running system and this typically takes a lot of effort and planning. And if you make a mistake in your execution and corrupt the system so it no longer starts… Your root-access will be gone along with the system no longer booting. You’ve bricked your device.
Ideally we want reliable control of how the unit boots. Then we need access outside the operating system, access at a higher level than root. We need machine-level access.
And this is what the serial-port very often can provide for us.
Basically this single finding gives us the safety and confidence we need to be way more adventurous! And now things are going to be moving forward at a much faster rate. Or at least so we hope!
So just what does the serial on our ReadyNAS 312 get us?
It’s time to find out!
A quick project reboot
We ended our last post inside Minicom, connected to the console of ReadyNAS OS, with a Linux login-prompt blinking in our face.
The first thing to check is obvious: Does our root login still work as expected here?

And yes, it very much does.
On embedded devices like routers, serial access often goes all the way down to the firmware bootloader, giving us effectively unrestricted access to the device as a whole.
But this is an Intel-based device, with a traditional AMI BIOS. Will we be as lucky, or will serial just be enabled once BIOS has passed control to the kernel in place?
There’s only one way to find out!
Yup. We’re literally going to reboot the device to gain the insight we need to reboot this project, this time from an outside looking in approach.

Wait wait wait. Is the BIOS itself serial-enabled? It sure looks like it! That’s about the biggest jackpot we can score!

Full BIOS control, connecting some dots and our first real facepalm
Sometimes you have to be told something you already knew in order to realize the obvious.
And at this point, from inside BIOS, that’s just what happened for me:
- In part 1, by using lsusb I determined there was a hidden flash volume inside the unit, from the kernel seen as /dev/sdc.
- In part 2, I discovered that the running ReadyNAS OS firmware actually resides on our data-drives, but containing no boot-code. So I hypothesised that the boot-code had to be on the hidden flash volume.
- In BIOS we get this confirmed. The ReadyNAS is booting from the flash volume… which wait… is a USB device?
So not only is the ReadyNAS (which has 3 USB ports btw) capable of USB booting, it is actually already USB booted.
How on earth did I miss that?

A facepalm. Probably the first of many to come. So now, armed with BIOS access, we might be able to simply boot Debian from an external USB drive, no messing with the existing ReadyNAS system at all.
That almost sounds too good to be true. Let’s press F2 at the appropriate time and find out!

After some testing reveals, it’s not quite that simple, but we still have something workable. Here’s what you need to know:
- In BIOS the internal flash volume is by default set as pri #1.
- It’s also pri #2, although that’s for UEFI boot. (This BIOS supports UEFI too!)
- Pri #3 is one of the NAS volumes (
P0), which we know isn’t bootable. - Seemingly that’s all your options, but if you go to the boot submenu “Hard Disk BBS priorities”, you can swap out
P0for a USB drive of your choice (but as usual only as long as it was inserted when you entered BIOS). - After doing this, you can assign your USB-drive pri #1, and it will boot.
That pretty much sounds like case closed, or what? Nooooo… There’s one very important pitfall to be aware of:
After being powered off, the ReadyNAS BIOS will revert to its initial boot priorities!
So unless you want a serial console to be required to boot your custom Debian install, we have no other choice: we will have to overwrite
/dev/sdcwith our own/bootpartition and boot-loader.And if you do that, uhm, you’ve sorta passed a point of no return. Well at least almost, unless you’ve prepared some backups.
Keeping it safe and boring
From what we’ve learned so far, the ReadyNAS unit depends on the following volumes to boot and operate:
- 250MB internal flash volume. May be exposed as
/dev/sdc, but not guaranteed to be so from another booted USB drive. If in doubt, check indmesg! - ReadyNAS OS firmware-volume. in my case exposed as
/dev/md0. This partition should be around 4GB.
The simplest way to back up small volumes like that is using a tool simply called “
dd“.But since
/dev/sdcis concealed from us from within ReadyNAS OS, we’ll need to USB boot into another Linux distro, like a Debian Netinstaller to get access to it for backup purposes.It really is as imple as that, with just one exception: We need to make the Debian Netinstaller serial-enabled first! Luckily for us, someone else has already described exactly how to do that.
Make sure to keep the same kernel command-line parameters as we’re already using. That is: tyyS0,115200.
Once you have your modified ISO, write it to a USB-stick using
dd, insert it into the ReadyNAS, reboot, enter BIOS, and ensure your USB-stick has the highest boot-priority.If you’ve done everything correctly, on next boot you should be greeted by a Debian installer.
After all this work, that really feels amazing, doesn’t it? It sure as hell feels well earned.

Exit to a root shell and identify the flash drive to backup:
sudo dmesg | grep logical
...
...
[ 6.629953] sd 6:0:0:0: [sde] 489472 512-byte logical blocks: (251 MB/239 MiB)
Notice how the/dev/sdcblock-device’s name may differ when booted from another USB device outside ReadyNAS OS! For example in the log above, we can see it exposed as/dev/sde.If you have another SSH-enabled host on the network (and ofcourse you do!), backing up the relevant partitions is dead simple:
# backup boot-partition
sudo dd if=/dev/sde | ssh user@backup-host dd of=readynas-flash.img
# backup readynas-os rootfs-partition
sudo dd if=/dev/md0 | ssh user@backup-host dd of=readynas-md0.imgTip: This technique is often be used to copy out large data from inside firmware on embedded devices (like routers) which has little to no internal storage.
So now… We know how the device works, we have made our backups.
There’s only one thing left to do!
Let’s dive into that in the next and possibly final post!
-
The ReadyNAS 312 – the (not so) secret serial-port
Note: This is part 3 of an ongoing series. For earlier posts in this series, see the ReadyNAS 312 tag.
The findings so far …
Before diving deeper into this, let’s sum up the important findings from part 2:
- The unit most likely boots from the embedded flash-volume
/dev/sdcwhich is visible indmesg, but not from with in ReadyNAS OS itself once booted. - The main ReadyNAS OS firmware is actually located on the drives used for general purpose NAS storage.
- To be able to upgrade/reinstall the unit, we need to have access to all volumes, including the hidden flash-volume.
- This leads to a reversal of strategy: Try to work from the outside of the unit into the OS, not from the inside the OS out to the unit.
- In the kernel command line inside
dmesg, we have found evidence of a serial-port!
This last finding excites us very, very much!
Serial ports – The 101
For those into general embedded hacking, they already know why a serial port matters.
For those not that deeply into it, a serial port (if used by the firmware and OS) let’s us tap into a machine or device which lacks video-output, and monitor or control it from an outside unit, using a text-mode only interface.
More to the point: they often let us intercept the boot-process and take control from the second the unit is powered on.
Which is exactly what we’d like to do in this case! What luck!
Looking for the port
On embedded devices like routers, you usually have to dismantle the device, and look around, use your intuition and guess where the serial port may be hidden. It may not even have connectors soldered on.
To the uninitiated, that may sound pretty hardcore.
A simpler way to find such a port is … having the answer ready, provided for you by someone else.
Looking around the internet, it seems like most of the ReadyNAS devices out there have a serial port of sorts. For some models, the fact that it’s there is even documented, or at least was.
But where is it?
Looking around, I found a few posts saying you needed to peel off a sticker to reveal it. Coming from embedded hacking, that sounds really familiar!
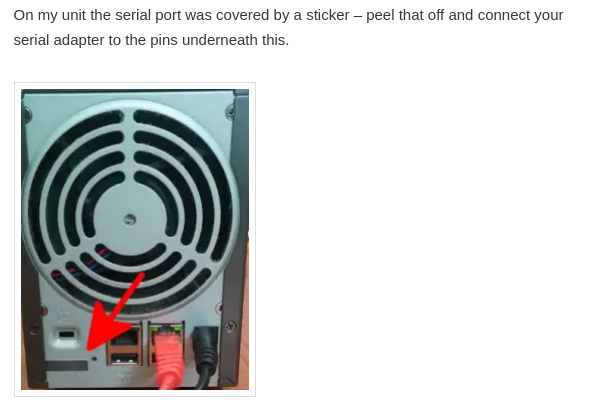
So let’s take a look at the ReadyNAS 312 once again… And what do we see?
That clearly looks peelable! And underneath?
4 pins and no label. A tell-tale sign of a serial-port hiding in plain sight. That’s got to be it!
Houston we’ve got contact!
Uncovering the serial port pin-out and configuration
First things first: We need to determine the pin-out.
This is usually easier when you can see the PCB the port is connected to, but to save ourselves from dismantling the device, let’s again try our luck and consult the internet.
And from the friendly website natisbad, we find this:
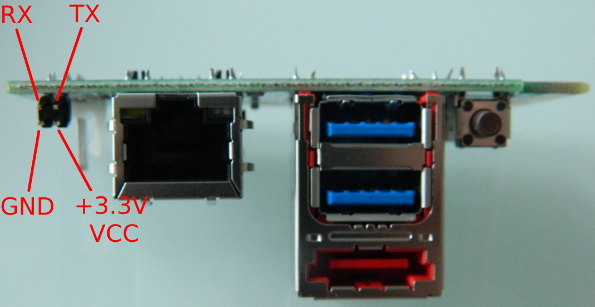
While the rest of the ports differ slightly, that serial port at least looks the same. It’s very plausible that this is our setup. Amazing stuff!
Wiring it up
Now to actually hook up to this serial-port, you need a serial-port on another computer to hook up with. As a default, those are getting pretty rare these days.
I mean, does your computer ship with one of these ports?
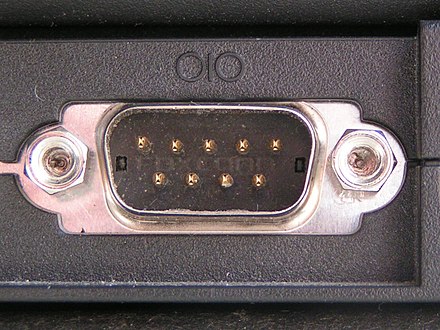
Computers sold last century had those to connect mice and other eccentric peripherals, like modems. Not so much these days.
So what do you do?
- If you have a Raspberry Pi, among all the magic pins in its huge GPIO connectors, it actually has a serial-port too. The pinout on the RPi may differ slightly between revisions, so make sure to check for your specific model. Also note, you probably have to enable it in the OS too.
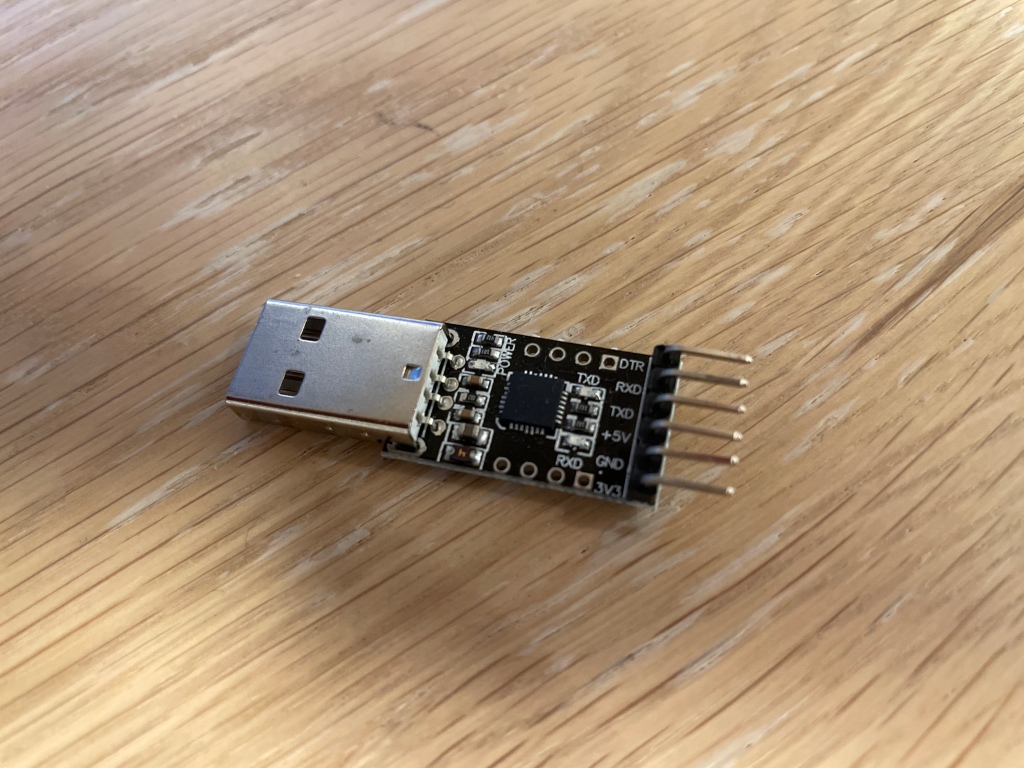
- Buy a cheap USB serial-port dongle from Ali Express, Deal Extreme, Ebay or wherever. Your luck may vary, but on Linux I’ve had luck with
cp210x-based units which has support directly in the kernel without any additional drivers. - Remember to buy the required cables too!
Obvious gotchas:
- The picture with the pin-out looks kinda upside down. You may inadvertently and subconsciously translate that image 180 degrees around, and apply the pin-out incorrectly. (I did this once and fried one of my USB serial dongles. Thanks god for having the Raspberry Pi as backup!)
- TX on one port should go to RX on the other port, and vice versa. I’ve done this mistake sooo many times.
In the end you should have something looking like this:

Configuring the port
Now we know the location of the port and we have a very probable pin-out at our hands.
Now we need to tie it all together.
My experience when working with devices like this is that it’s almost without exception working at a rate of 115200 bps. And that’s what the ReadyNAS kernel command-line says too, so that’s a safe bet:
root@ReadyNAS:~# dmesg | grep ttyS
[ 0.000000] Kernel command line: console=tty0 console=ttyS0,115200 hpet=disable initrd=initrd.gz reason=normal BOOT_IMAGE=kernel
In Linux, on a Raspberry Pi, you will typically find the serial-device at
/dev/ttyS0. If you use a USB-dongle,/dev/ttyUSB0is more likely. If in doubt, just insert the dongle, rundmesg, and see what device got added by the kernel at the very end of the log.With that in place, let’s get our hands dirty.
Let’s go digging!

Enter Minicom
First things first. What is Minicom? From wikipedia:
Minicom is a text-based modem control and terminal emulator program for Unix-like operating systems
Use the following commands to get started (and adapt serial-port device to your needs).
sudo apt install minicom
sudo minicom -D /dev/ttyS0
At first I didn’t really get a response, and when that happens it’s because you still haven’t really configured the serial-port yet. So much work! This is clearly not plug and play!
In Minicom, press
CTRL-AthenZto bring up the help-menu:
From here, click
O(the letter O) to bring about the configuration menu, and then choose “Serial port setup”:
Make sure it looks like this:
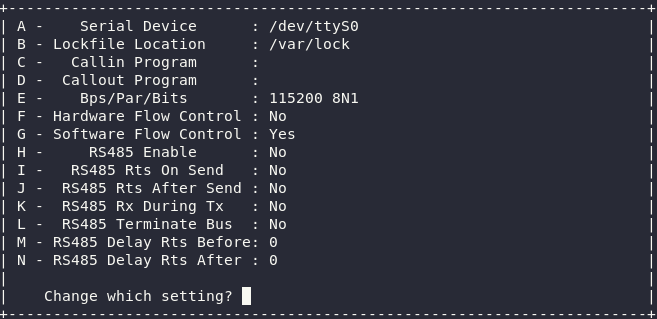
Notice you want Software Flow Control ON, and Hardware Flow Control OFF. You can toggle this by first pressing
F, then pressingG.Press
ESCtwice to exit both menus, leaving you back in a blank Minicom console.If you’ve done everything correctly (and the unit is powered on), pressing enter in Minicom should now give you this friendly prompt:
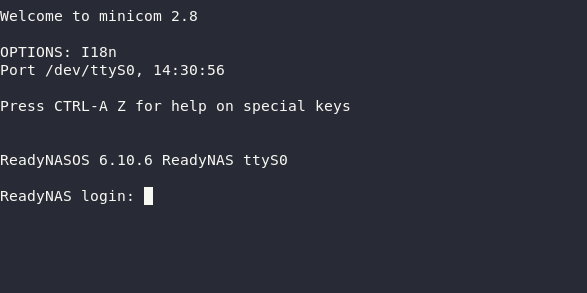
Hello from inside the matrix! When working with embedded devices, this is where I usually preemptively declare victory and assume that from here on out, I got all I need.
This is clearly a major breakthrough!
Now if you don’t get a prompt like that, but only stuff looking like garbage or nothing at all, you may try the following:
- Reboot the ReadyNAS. Sometimes when fiddling with the port (and failing!) from inside a booted system, the rate may sometime get set to 9600. Don’t ask me how. At reboot it was reset back.
- Double-check the wiring again. Ensure TX on one end is wired to RX on the other end.
Assuming you got all that working… Now what can we use a serial console for? And what can we use it for on this device?
Find out in the next post! This is where things are starting to get fun!
Roll credits, and a short disclaimer
Wiring up a serial-port incorrectly can severely damage your units.
One USB serial-port dongle was terminally damaged as a result of this operation. May it rest in piece.
It’s dead, Jim. - The unit most likely boots from the embedded flash-volume
-
The ReadyNAS 312 – Coming up with a Plan B
Note: This post is part 2 in a ongoing, multi-part series. The previous post can be found here.
The situation so far…
Before diving deeper into this, let’s sum up all our findings from post 1:
- We have a Netgear ReadyNAS 312 which is now running outdated and obsolete software, with no vendor-provided updates in sight.
- The NAS itself seems like a fairly standard X86 PC built into a small form-factor chassis, with all capabilities one would expect from a normal PC. It might even have a hidden VGA-port somewhere!
- There’s also an internal flash-volume somewhere, still unexplored.
- The NAS’s firmware ReadyNAS OS is based on Debian Linux (Jessie), and Plan A was to simply dist-upgrade that in place to a more modern version.
- Simply upgrading the base system might leave the device in a non-working state, due to the proprietary ReadyNAS components installed alongside not being built for newer Debian versions.
Deciding upon the road ahead
I consider myself a fairly proficient Linux-user and “home lab”-grade Linux-admin. I do need a NAS at home, but I do not need that NAS to run a Netgear specific implementation.
Basically, if I can get this thing to run Debian, and plain Debian only, I can again turn that into a workable NAS in no time. I’ll be happy and then this unit can be considered fully “repurposed”.
So Plan B is pretty not that far off from Plan A: I want to get this unit to run an up to date version of Debian, but I don’t care about ReadyNAS-specific stuff at all.
Mapping out what we have
So with our goal re-adjusted and settled, let’s see how we can get there!
In my experience, if you want to rebuild something, it’s often helpful to see how the stuff you already have was built. You’re probably going to be reusing quite a bit of it.
Or at least, that’s what you hope.
The booting
If we want to reuse the existing settings supporting the boot-process in already place, we need to know what’s where. This unit is probably too old to be rocking UEFI, and having the
efibootmgrcommand missing confirms this.root@ReadyNAS:~# efibootmgr
-bash: efibootmgr: command not foundWhich means there’s almost a 100% chance that the NAS is using legacy BIOS MBR boot.
Even if it’s not required with UEFI, it’s still commonplace to use Linux-specific boot-loaders like GRUB (or on an old unit like this, even LILO). But when legacy BIOS MBR boot is used, you have no other option. You need such a boot-loader or it won’t boot.
Which boot-loader is being used, and how it’s booting the system is something we expect to find traces of somewhere in
/etc, where its configuration should be stored.Stranger things, NAS edition

Trying to find the configuration-files for the boot-loader, I uncovered a several strange things:
- There’s no boot-loader configuration/templates in
/etc. - There’s also no boot-loader config-files in the
/boot-folder. In fact that folder is empty, and there’s no/boot-volume mounted, at all. - While I expected to find a base Debian install on a firmware-volume, and my NAS-data on a separate RAID-volume, I instead found two different RAID-volume(s) created from the inserted NAS disks.
- These two volumes contained both my NAS-data and the Debian Jessie root-filesystem.
Hold on now. Hold horses. We need to fully realize the gravity of that last finding.
This NAS evidently runs its firmware from the disks inserted into it, which is also used for storing your data. And that firmware has no boot-code.

Clearly we’re missing something here. Clearly!
So let’s just take a look at what a simple mount tells us:

The only block-devices mounted are mdadm-type devices.
root@ReadyNAS:~# mount | grep "/dev/md"
/dev/md0 on / type btrfs (subvolid=5,subvol=/)
/dev/md127 on /data type btrfs (subvolid=5,subvol=/)
/dev/md127 on /apps type btrfs (subvolid=258,subvol=/.apps)
/dev/md127 on /home type btrfs (subvolid=256,subvol=/home)
/dev/md127 on /run/nfs4/home type btrfs (subvolid=256,subvol=/home)
And probing into that,
mdadmtells us that these two soft-raid devices are created on top of partitions of the two same physical volumes:
So we have 2 raid devices, created from different partitions (1 and 3) across 2 physical volumes (
/dev/sdaand/dev/sdb) …?I’m not sure what’s industry standard in the NAS-business, but I sure as heck don’t construct my RAIDs that way. And what’s up with the unused partition 2? So many questions!
Apart from that we can see it’s using btrfs, which is a standard Linux file-system, so I should be able to mount those volumes using any standard distro. My data should be fully portable to a new setup I create.
Phew! That’s good news at least.
The mysterious missing boot-code
We know for a fact that something has to boot this system, because we can observe the system being booted. Time to check the kernel logs!
The command
dmesgwill give us the full kernel boot-log which is probably more than we need. For now we’re mostly interested in storage devices. Then this one-liner here will help us sum it up:root@ReadyNAS:~# dmesg | grep logical
[ 3.494963] sd 0:0:0:0: [sda] 11721045168 512-byte logical blocks: (6.00 TB/5.46 TiB)
[ 3.969874] sd 1:0:0:0: [sdb] 11721045168 512-byte logical blocks: (6.00 TB/5.46 TiB)
[ 8.695234] sd 6:0:0:0: [sdc] 489472 512-byte logical blocks: (251 MB/239 MiB)Whoah. Who’s that guy called
sdc? Looking into/dev/there’s no mention of him there!
That means that the device itself is not only boote from a file-system which is hotswapped/exchanged for another one sometimes during the boot-process. It’s also booted from a device which someone is working hard to keep hidden from the running system itself.
That sneaky bastard!
There may be ways to restore this
sdc-device into the device-tree, but that’s past my level of tinkering.What I feel like now is that it’s time (to try) to turn this process around 180-degrees.
- So far I’ve been working from the inside of the OS, trying to work my way out to the machine.
- But clearly we now need to do the opposite: Work our way from the outside, from the machine, into the OS. We need to see this thing boot.
Now as far as I know we have 2 possibilities for that:
- Open up the case and try to locate the VGA-pins on the mainboard and solder on a connector. Clearly a hardware-mod.
- Hope there’s a more accessible serial-port somewhere we can make use of.
Lucky for us there’s a simple way to check for the latter:
root@ReadyNAS:~# dmesg | grep "Kernel command line"
[ 0.000000] Kernel command line: console=tty0 console=ttyS0,115200 hpet=disable initrd=initrd.gz reason=normal BOOT_IMAGE=kernel
Translation: There is a console attached to to
/dev/ttyS0, to a serial-port device.Now why would someone put that into their kernel-config unless there is a serial-port to wire up?
We’ll dive into that in the next part!
-
The ReadyNAS 312 – A short backstory and a failed Plan A
Please allow me start with some backstory.
Back in 2015 I bought a Netgear ReadyNAS 312. As the name implies it’s a NAS-appliance, fairly minimal one with only 2-bays. That makes it compact and quiet enough to fit in your living-room without attracting any attention.

While it’s no secret that most appliance-like devices eventually reach a end of life, or end of support from its vendor, I had higher hopes for this one… Because once you peek inside, what you find is actually very much a traditional PC, just in a small form-factor chassis.
So just what do we have here?
- A Intel Atom D2701 dual-core CPU with hyper-threading
- 2GBs of RAM
- 2 hot-plug SATA bays
That’s more than plentiful to power your basic NAS-like needs. And the cherry on top? The firmware it runs, called ReadyNAS OS, is actually based on plain Debian Linux!
Keeping this thing running until it breaks should be a piece of cake, right?
And so it seemed. I honestly can’t recall having a single issue with this device in its entire lifetime. Well, until now.
The first bad vibes
The decay may have started earlier, but I didn’t notice until I became aware of a very highly rated Samba security vulnerability. I was 100% certain this unit had to be affected, and having it on the network with this issue unpatched was … probably not optimal.
When investigating that vulnerability I made several discoveries:
- ReadyNAS OS haven’t had a single update or release since March 2021, almost a year at that point.
- ReadyNAS OS is based not just on Debian Linux, but Debian Jessie, which reached end of support already in June 2020. That’s 18 months past obsolete.
So while the unit has received ReadyNAS OS updates throughout its lifetime, none of those updates seem to have upgraded the base Debian-installation to something modern or supported.
Oh bugger! This unit is effectively already on life-support!

Take a deeeeep breath…
Think carefully… Now what do we do?
Plan A: Do the obvious
When your PC runs an outdated version of an operating-system, the obvious solution is obvious:

You just update it to a more recent version. Simple! You don’t have to be a rocket-scientist to come up with that kind of plan.
So how about just upgrading Debian to a more modern version? How hard can that be?
Well to do that, we first we need to get system-access to the unit, properly. In the world of Linux, proper system-access usually means being able log in to a root account via SSH.
Luckily for us, in the web-based admin-UI we can enable SSH-access, no hacks required:

Green SSH toggle should be green! And once you have SSH enabled, logging in as the root-user is even documented: Just use the username “root” and the same password you use for your admin-user in the web-interface.
Easy as pie!

That gives us everything we technically need to upgrade this box, but safety first. Let’s first inspect our environment and check if all our “basic PC” assumptions holds true before doing anything radical.
First lets get some tools we’ll need:
$ apt install pciutils usbutils dmidecodeWith those in place, we have some new tools we can try:
- lspci
- lsusb
- dmidecode
The first two commands should be fairly obvious. The last one may best be illustrated by showing its output.
SMBIOS 2.7 present.
37 structures occupying 1577 bytes.
Table at 0x000EB8D0.
Handle 0x0000, DMI type 0, 24 bytes
BIOS Information
Vendor: American Megatrends Inc.
Version: 4.6.5
Release Date: 10/10/2013
Address: 0xF0000...The biggest issue with non-PC devices is usually figuring out what makes them boot. Lucky enough this unit seems to come with a bog standard AMI BIOS, so for the time being it seems safe enough to assume that booting is done in a fairly conventional way, compatible with any standard X86 Linux-distro out there!
That’s really good news! Apart from the BIOS date of course, but we’ll pass on that for now.
lspcialso shows us this device may have more capabilities than exposed on the back of the unit. This unit may not have an external VGA-connector, but inside the chassis, there sure as heck is something VGA-capable:root@ReadyNAS:~# lspci
...00:02.0 VGA compatible controller: Intel Corporation Atom Processor D2xxx/N2xxx Integrated Graphics Controller (rev 0b)
...If all other plans fail, this may come in handy later!
lsusbalso shows us something interesting, although not entirely unexpected:root@ReadyNAS:~# lsusb
Bus 001 Device 002: ID 090c:1000 Silicon Motion, Inc. - Taiwan (formerly Feiya Technology Corp.) Flash Drive
...It seems there’s a hidden flash-drive inside the unit which probably is used to store the unit’s firmware. We’ll definitely want to take a look at that one soon enough too.
All clear?
So before going ahead and doing the obvious… Let’s ask around. Let’s see if anyone else have done this very obvious thing too? Someone in the Netgear community have suggested it, but nobody has dared to go through fully, and those who tried seems to have encountered issues.
Basically it seems:
- ReadyNAS OS consists of a plain Debian Jessie base which is easy to upgrade.
- But it also contains some proprietary ReadyNAS stuff which fails to load on newer Debian versions, possibly causing the unit to fail to start.
Ooops. We might be bricking this unit if we move too fast.
So Plan A is not quite out the window yet, but it might not be as simple as it at first seemed.
Seems I have to dig a little harder to come up with a way to safely upgrade this unit.
But that’s for next time!
-
Hello repurposable world
So we’re all been there. You buy a piece of kit, it does what it’s supposed to and for a while everyone is happy.
But then one day you read about a security vulnerability or something, and from what you read, things are terrible all over and everyone needs to update something, and fast.
Somewhere in the back of your head you start wondering if that impacts you and some of the stuff you own, like that nice piece of kit you bought a little back. Somewhat optimistic you decide to check for updates.
And sometimes that works out! Not all vendors sucks. Yay!
Way too often though you will find that your gadget, while still perfectly good hardware, is now being let down by obsolete software. The illusion of a locked down appliance which “just works” is suddenly broken. There’s no free lunch. And especially not in the marriage of hardware and software.
So what do you do?
If it’s an Android smartphone, chances are that someone else is providing up to date AOSP-based builds for it. You might be in luck!
If it’s a router or a WiFi access-point, chances are OpenWRT, dd-wrt or some other derivative or fork got your back. Their list of supported hardware is very impressive, and there’s a community full of people taking great pride in providing a standardized solution across a diverse range of devices.
But … for other stuff? Network Switches? Granted they don’t always have security issues, but they sure can be buggy. No community there, as far I know.
And storage appliances? There’s not really much a community for that.
And tons of other stuff too. All perfectly good hardware, turned into e-waste because nobody can fix the software on them.
And that’s where I am now. I have a ReadyNAS 312. It got a dualcore Intel CPU with hyper-threading, 2GBs of RAM and 2 bays. Plentiful to fulfill its lightweight NAS-duties for sure!
But it has been EOLed by Netgear. It’s not getting updates, and haven’t for a while. To make matters worse, unpatched Samba CVEs scored at 9.9 makes it insecure to have this device on a network at all.
And there’s no community to turn to for up to date software options either. You’re seemingly on your own.
So .. it’s terminal then?
I don’t know! But I know I won’t give up without at least giving it a try.
So in this blog I will detail my ongoing adventures in trying to repurpose devices and prevent them from becoming e-waste, hoping possibly to inspire others to do the same.
I can’t claim to be supremely qualified. I can’t promise to present findings or techniques not found elsewhere. Heck, I may not even succeed!
But I’m going to do my best. I’ll go through the tools I know, and how they can be applied. I’ll use my intuition to apply them to the problem at hand. I’ll present ideas on how a device may be salvaged, which may or may not lead anywhere. It’s going to technical for sure.
If you think that sounds interesting, feel free to follow me on my journey to fix broken stuff. To make things repurposable.

repurposable
Supporting the Right To Repair, the hacker way